How can you format your computer?
Windows 7/10:
To perform installations for Windows 7 and Windows 10,
you'll first need an ISO. To obtain the Windows 10 ISO file, you can use this link. As
Windows 7 is no longer available on the official website, you'll need either
the boxed version you've purchased in the past or a digital version.
Clicking the button enclosed in the box will initiate the download of the Media Creation Tool named "MediaCreationTool.exe," allowing you to download the ISO file onto your computer.
Once you open the "Media Creation Tool," carefully
read and accept the displayed license terms from Microsoft.

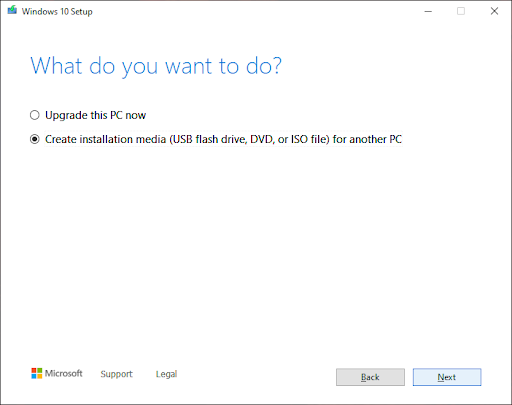
After accepting the Microsoft license, when prompted for the
installation method, select "Create installation media for another PC (USB
flash drive, DVD, or ISO file)" and proceed to the next page by clicking
"Next."
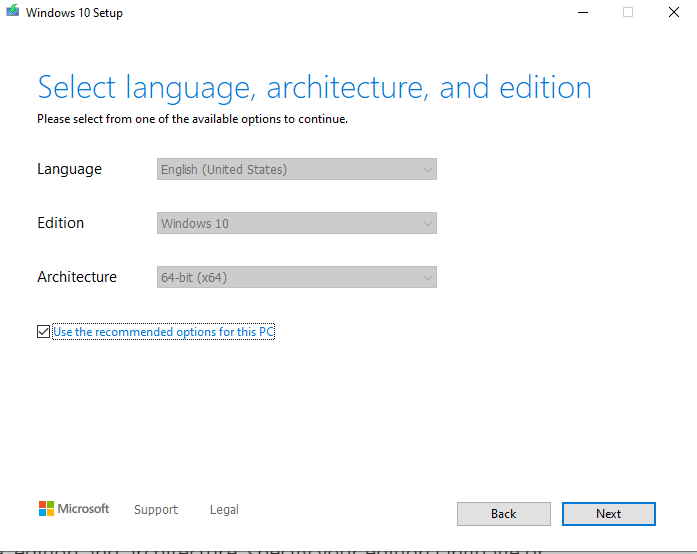
Customize the language and architecture settings for the Windows 10 installation as per your requirements, then proceed to the next step.
When selecting the media type, if you have a flash drive connected to your computer, choose "USB Flash Drive" to directly write the ISO onto the flash drive. Alternatively, you can save it as an ISO file to use the RUFUS program later to write the ISO file.
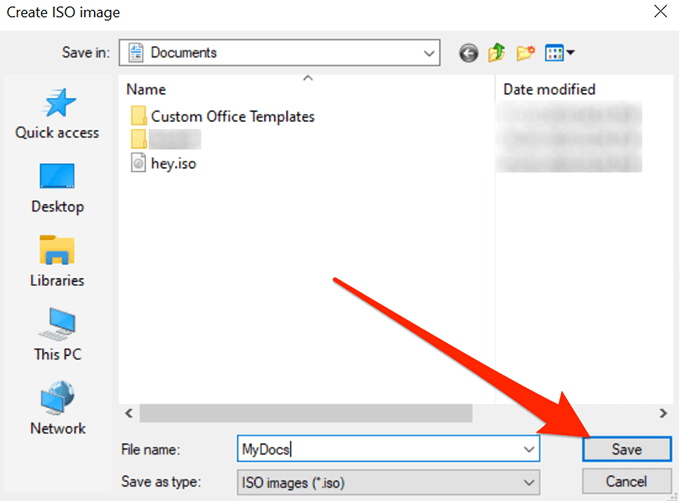
If you wish to save the ISO file, mark the ISO file option, proceed to the next step, and specify the location where you want the ISO file to be saved.
If you have an existing ISO file but haven't written it to your flash drive, open the RUFUS program. Locate and select your flash drive in the device section. Click the "SELECT" button in the boot selection tab, navigate to the location of your ISO file, and select it.
Once you've selected the ISO file, the START button at the bottom right will become active. Begin writing the ISO file to your flash drive by clicking START. Do not remove the flash drive or turn off your computer during this process.
After writing the ISO file to your USB flash drive, shut down your computer from the start menu. Insert your Flash Drive into one of the main USB ports on your computer (rear panel for desktops or right/left USB ports for laptops).
Turn on your computer using the power button. As the
computer boots up and you see the logo of your motherboard manufacturer in the
lower left corner with the BIOS SETUP text, press the specified key:

- Acer and Asus: F2 or Del
- Dell: F2 or F12
- HP: ESC or F10
- Lenovo: F1, F2, or Fn + F2
- Lenovo ThinkPads: Enter + F1
- MSI: DEL
- Samsung and Toshiba: F2
- Sony: F1, F2, or F3
Once you're in the BIOS settings, navigate to the
"BOOT" tab. Press Enter on "Boot Option #1" and select your
Flash Drive (USB Flash Drive).
After selecting it, go to the "Save & Exit" tab. Use the Save & Exit option within the tab to save your settings and exit the BIOS (Shortcut: F10, but it can vary from motherboard to motherboard).
Wait for your computer to restart. When the device boots up,
it will display the Windows 10 setup window. Make the necessary selections and
proceed to the next stage by clicking "Next."
Enter the product activation (license) key when prompted and
proceed to the next stage by clicking "Next." If you don't have a
license key, you can select the option "I don't have a product key."

After entering the license key, if you don't want to perform a clean installation, you can upgrade/update your device to Windows 10 without losing your data using the "Upgrade/Update" option at the top (not recommended).
If you wish to perform a clean installation, select
"Custom: Install Windows only (advanced)."
After selecting your hard disk from the available options,
click on the "Delete" button below to completely erase all data on
the hard disk. Then, select your hard disk again and click on the
"New" button to create a space for storing data on your hard disk.
(If you're unsure, avoid changing the data value that appears when you click
the New button!)
Proceed by clicking "Next," and wait for the
completion of all Windows installation steps in the new window. During this
process, do not interrupt the power to your device and do not remove the Flash
Drive. Your computer may restart automatically during the formatting process;
this is a normal part of the procedure.
When your computer restarts, you can choose the option
"Sign in with a Microsoft account" to link your account with your
device. If you prefer not to do this, you can bypass this step by disconnecting
your internet connection on your computer.
Congratulations! Your Windows 10/7 installation has been
successfully completed!
Windows 11 Installation:
To initiate a Windows 11 installation, you'll first need an ISO file. If you have an original CD, you can proceed without requiring an external ISO.
To obtain the ISO file, start by accessing Windows' official website through this link. Scroll down to find the "Windows 11 Disk Image (ISO) Download" section. Choose Windows 11 (multi-edition ISO) from the multiple selection menu, initiate the download, and ensure the language preference. Confirm your choice with the 'OK' button below the download button.
This action grants temporary permission to download the
Windows 11.iso file, creating a button under the "Windows 11 Disk Image
(ISO) Download" tab. Use this button to download the ISO in your selected
language.
Once you have the downloaded ISO file, open the program
named RUFUS to write it onto your flash drive. Locate your Flash drive's name
in the device section. In the Boot Selection section, click "SELECT",
navigate to the location of your ISO file in the prompted window, and then
choose your ISO file. Ensure that the "Disk Partition Scheme" is set
to GPT and that the "Target System" is "UEFI (non-CSM)."
Upon selecting the ISO file, the START button at the
bottom right will become active. Use this button to begin writing the ISO file onto your Flash drive. Throughout this
process, do not remove the Flash drive from your computer, and avoid shutting
down your computer.
After writing the ISO file to your Flash drive, shut down your computer via the start menu and insert your Flash drive into one of the main USB ports on your computer (rear panel for desktops, right or left USB slot for laptops).
Turn on your computer using the power button and, upon booting up with your motherboard manufacturer's logo appearing, press the designated key next to the "BIOS SETUP" text in the lower-left corner.
Once you access the BIOS settings, navigate to the BOOT tab.
Press Enter on Boot Option #1 and select your Flash Drive (USB Flash Drive).
After making the selection, go to the Save & Exit tab. Within this tab, use the Save & Exit option to save your settings and exit the BIOS. You can use the shortcut F10, but remember this key may vary from motherboard to motherboard.
Wait for your computer to restart. When the device boots up,
you'll be greeted with the Windows 11 installation window. Make necessary
selections based on your requirements and proceed by clicking Next.
Enter your product activation (license) key when prompted
and proceed by clicking Next. If you don’t have a product key, you can select
the "I don't have a product key" option.
Once you've entered the product key, on the following screen, if you don’t want a clean installation, you can use the Upgrade/Update option at the top to transition your device to Windows 10 without losing data (not recommended).
If you want a clean installation, select Custom: Install
Windows Only (Advanced).
Select the hard disk where your data is stored in the disk
section. Click the Delete button below to completely erase the data on the hard
disk. Then, select your hard disk again and click the New button to create a
space for storing your hard disk data. (If you're unsure, avoid changing the
data value that appears when clicking the New button!)
Proceed by clicking Next and wait for the completion of all
Windows installation processes in the new window. During this process, do not
interrupt the power supply to your device and do not remove your Flash Drive.
Your device may automatically restart during formatting; this is a normal
process, so don't worry.
Once the operations are complete, your computer will
restart, and you'll see the Windows logo with spinning circles indicating
installation.
Once the installation is completed, fill in the screens
according to your needs and personal details.
After selecting your country and region, as well as the keyboard layout, if your device is connected to the internet, it will check for driver updates and restart if updates are found.
After the restart, specify the name for your device.
Once you've named your device, a window will appear asking you to choose the usage scenario for this device. Make a selection based on your needs:
- Set up for personal use.
- Set
up for business use.
After making your preferences, in the next step, Windows
will ask you to log in to a user account. Fill in the required information. If
you don’t have a user account, click Other options and continue with an offline
account.
Next, the device will prompt you to specify who will use the device, followed by asking for a password. Entering a password is optional.
Congratulations, your Windows 11 installation has been successfully completed.
Related Articles
How to map a Network Drive?
Step 1: Connect to Network Drive Open File Explorer and navigate to the "This PC" or "Computer" tab. Step 2: Add a Network Drive Select the "Mapping" tab from the top menu bar. Click on the "Add Network Drive" option. 3. Enter your username and ...